

We provide specialized winterization services to safeguard your pool during the off-season, and when spring arrives, we handle the thorough opening process.
Recent Posts


Sign Up to get updates & news about us . Get Latest Deals from Walker's Inbox to our mail address.
Sign Up to get updates & news about us . Get Latest Deals from Walker's Inbox to our mail address.
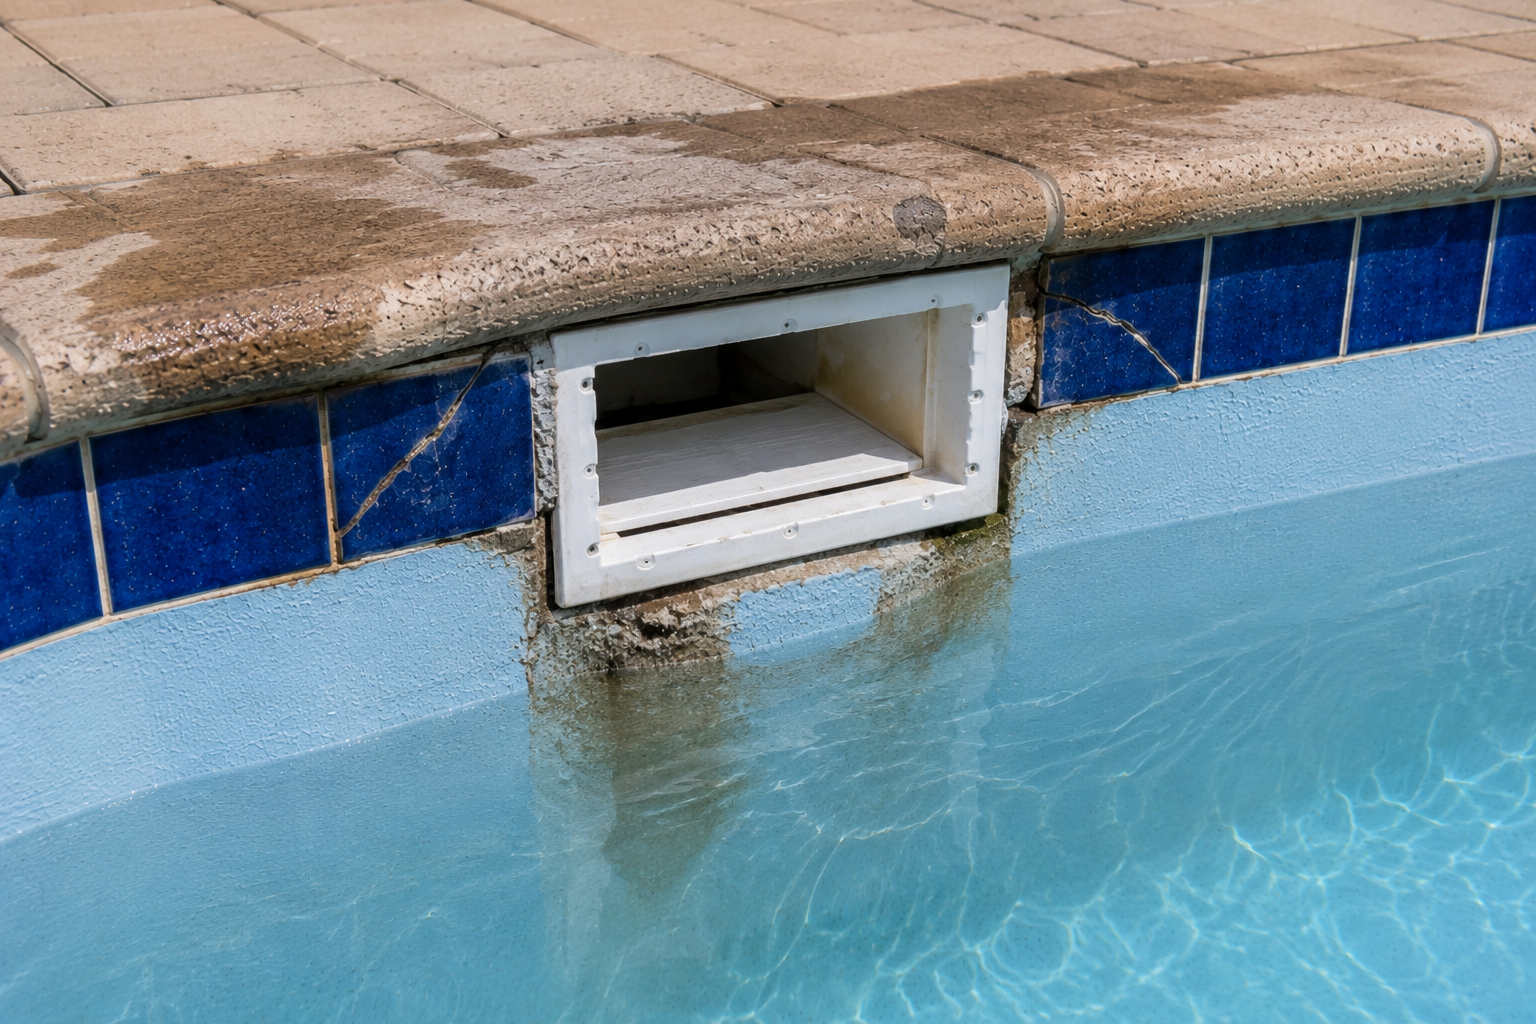
A leaking pool skimmer can cause persistent water loss, wet paving, weak suction and damage beneath the surrounding pool edge. Absolute Pools provides skimmer leak detection and repairs across Cape Town and surrounding areas.
The skimmer draws surface water into the pool’s filtration system. It is built into the upper section of the pool wall and connects to an underground suction pipe leading to the pump.
Leaks can develop in the skimmer body, around the joint where the skimmer meets the pool wall, at the pipe connection beneath the skimmer or inside the underground suction line.
Because most of the skimmer and its plumbing are hidden beneath coping and paving, the source is not always visible. Water may travel through the surrounding ground before appearing as damp paving, loose coping or sinking soil some distance from the actual fault.
A skimmer leak should be investigated before the surrounding pool edge is repeatedly patched. The body, throat, fittings and connected plumbing need to be considered together.
Common signs of a leaking pool skimmer include:
A pool can have more than one leak, so a water level that stops near the skimmer does not automatically prove that the skimmer is the only problem.
Fill the form below and our team will be in touch with you shortly.
Skimmer bodies are commonly manufactured from plastic or formed as part of a concrete structure.
Plastic can become brittle with age, chemical exposure, ground movement and prolonged sunlight around the upper pool edge. Fine cracks may develop around corners, pipe connections and the base of the skimmer.
A crack can leak slowly at first and become more noticeable as it widens. Surface sealant may not provide a lasting repair when the body continues moving or has deteriorated across a larger area.
The point where the skimmer throat meets the pool wall is a common leak location.
The skimmer and pool shell are different materials and may move at different rates. Over time, the joint can crack, shrink or separate.
Water may escape through a narrow opening around the sides or bottom of the skimmer mouth. The defect can be partly hidden by tiles, grout, marbelite or a previous patch.
The damaged joint must be opened and prepared properly before it is resealed.
A pipe beneath the skimmer carries water towards the pool pump.
The pipe or connection can crack through age, ground settlement, poor installation or movement around the pool edge. A leaking suction line may draw air while the pump runs and release water into the ground after the system switches off.
The pump basket may remain partly empty, and air bubbles may appear from the return jets.
Pressure or vacuum testing may be required to distinguish a pipe leak from a damaged skimmer body.
The threaded or glued fitting at the bottom of the skimmer can loosen, crack or separate.
This connection is difficult to inspect without accessing the area beneath the skimmer. Water loss and air entering the suction system may occur together.
Where the fitting is damaged, sealing the visible skimmer throat will not resolve the leak.
The skimmer throat is the channel between the pool wall and the main skimmer chamber.
Cracks can develop through structural movement, impact or poor bonding between the skimmer and pool shell. Tiles and grout around the opening may crack along the same line.
The surrounding pool finish should be removed far enough to expose the complete damaged section.
Grout around tiled skimmer openings can become cracked, recessed or loose.
Water then enters behind the tile installation and may reach a failed joint between the skimmer and pool wall. The surrounding tiles can become hollow or fall away.
Replacing grout alone may not stop the leak when the joint beneath it has already separated.
Loose tiles near a skimmer may indicate movement or moisture behind the tiled finish.
The adhesive and supporting plaster can deteriorate as water passes through damaged joints. Several tiles may detach together, exposing a larger section of the skimmer connection.
All loose material should be removed before the joint and tiles are repaired.
Settlement or movement in the concrete or gunite shell can affect the skimmer opening.
The crack may continue from the skimmer into the pool wall, coping or surrounding paving. Resetting tiles or applying sealant without repairing the structural movement can lead to another failure.
The skimmer should be assessed together with any related pool-wall cracks.
Paving around the skimmer can settle or push against the pool edge.
This movement may place pressure on the skimmer body, coping and upper pool wall. Cracks can develop where the materials meet.
The paving base and drainage may need repair before the skimmer area is rebuilt.
A skimmer may leak prematurely when it was installed without secure support or a properly sealed connection to the pool structure.
Pipework can also be placed under stress when it is misaligned or surrounded by poorly compacted backfill.
The repair should correct the installation weakness rather than cover the visible opening only.
Skimmer leaks are sometimes treated with thin surface sealants that do not bond securely to wet, loose or contaminated material.
The patch may appear successful for a short period and then crack or peel as the joint moves again.
Old repair material should be removed before the underlying defect is assessed.
Older plastic skimmers can become brittle and discoloured.
Cracks may develop around screw holes, corners, lids, baskets and pipe connections. One visible crack may be part of wider material deterioration.
Replacement may be more practical when the body has become fragile or has several damaged areas.
Roots can disturb underground pipes, paving and soil around the skimmer.
A root may place pressure on the skimmer pipe or contribute to movement in the surrounding pool edge. Nearby irrigation can also keep the ground saturated and weaken support.
The landscaping should be considered when skimmer leaks and paving movement occur in the same area.
Rainwater, irrigation and pool splash should drain away from the skimmer area.
Persistent moisture can soften supporting ground and contribute to movement around the pool edge. Cape Town’s wet winter periods may expose drainage weaknesses that remain less noticeable during summer.
Drainage faults should be corrected before unstable paving and coping are reinstated.
Fill the form below and our team will be in touch with you shortly.
A pool with a skimmer leak may lose water until the level falls below the damaged part of the skimmer opening.
The water loss can then slow down or stop because the defect is no longer submerged. This pattern provides a useful clue, but it is not conclusive.
A leak in a fitting, tile joint or pool-wall crack at the same height can produce similar behaviour. Evaporation and pump operation should also be considered.
The water level should not be allowed to fall so low that the pump draws air through the skimmer.
Water loss that becomes more noticeable while the pump runs may indicate a pressure-side leak elsewhere in the system, but skimmer and suction faults can still contribute.
A damaged skimmer joint may leak continuously while increased water movement makes the loss easier to notice.
The complete system should be tested rather than relying only on whether the pump is on or off.
A skimmer body, throat or suction connection can continue leaking when the pump is off.
The water may move through the crack into the surrounding ground until the pool level falls below the damaged section.
A suction pipe can also release water after shutdown, even if it mainly draws air while the pump operates.
Fill the form below and our team will be in touch with you shortly.
Wet paving concentrated near the skimmer can indicate a leaking skimmer body, pipe connection or structural joint.
The water may move beneath the paving before reaching the surface, so the damp patch is not always directly above the leak.
Other possible sources include rainwater, irrigation, splashing and drainage problems. Persistent moisture during dry weather deserves closer investigation.
The paving should not be repaired until an active leak has been ruled out or corrected.
A long-term skimmer leak can wash away bedding sand and supporting soil.
The paving may begin sinking, rocking or separating from the coping. Gaps can open around the skimmer lid and pool edge.
Repairing the leak stops additional washout, but the lost support must still be rebuilt before the paving is relaid.
Coping above the skimmer can loosen because of water entry, movement or deteriorated mortar.
The skimmer opening interrupts the continuous upper pool wall and can create a weaker transition between materials. Cracks may develop in the coping joints and waterline tiles.
The coping, skimmer connection and surrounding pool edge should be repaired together where they are connected.
Fill the form below and our team will be in touch with you shortly.
Cracks may appear along the sides, base or corners of the skimmer throat.
Fine cracks can be limited to grout or marbelite. Wider or recurring cracks may extend into the pool wall or joint around the skimmer.
The damaged finish should be removed so the true depth and direction of the crack can be seen.
Air bubbles from the return jets indicate that air is entering the suction side of the circulation system.
Possible causes include:
The skimmer should be tested alongside the other possible suction-side faults.
A skimmer or suction-pipe leak can prevent the pump from maintaining a solid water supply.
The pump basket may contain a large air pocket, water may surge inside it and the return flow may become inconsistent.
Running the pump without sufficient water can damage the mechanical seal and internal components. The system should be switched off if the pump repeatedly runs dry or overheats.
Fill the form below and our team will be in touch with you shortly.
Weak skimmer suction can result from air entering through a cracked body, failed pipe connection or damaged suction line.
Blocked baskets, a clogged impeller and closed valves can produce similar symptoms.
The skimmer basket, pump basket, valves and pump condition should be checked before underground repairs are recommended.
Many automatic pool cleaners connect through the skimmer or share the same suction system.
A leaking skimmer or suction pipe reduces the water flow available to the cleaner. The cleaner may move slowly, stop in one area or fail to operate entirely.
Repairing or replacing the cleaner will not solve weak suction caused by a skimmer or plumbing leak.
Loose or cracked tiles may hide a failed joint between the skimmer and pool wall.
Water can enter through damaged grout and travel behind the tiled finish. The adhesive and plaster may become hollow before the tiles detach.
The repair should include removal of loose tiles, preparation of the skimmer joint and reinstatement of a secure tile base.
Fill the form below and our team will be in touch with you shortly.
Some fibreglass, vinyl-lined and prefabricated pools use a skimmer faceplate and gasket system.
Leaks can develop when the gasket deteriorates, screws loosen or the surface around the opening cracks.
Tightening the screws excessively can damage the faceplate or pool surface. The correct gasket and sealing arrangement should be restored.
Water collecting beneath the skimmer can indicate a crack in the base or failed suction-pipe connection.
The defect may not be visible from inside the skimmer because it sits beneath the basket or lower fitting.
Targeted access may be needed through the paving or surrounding ground to inspect and repair the connection.
A side-wall crack may result from ageing plastic, ground movement or pressure from surrounding paving.
Small surface patches may fail because the skimmer continues flexing. A more extensive repair or replacement may be needed when the body is brittle.
The surrounding support should be stabilised so the repaired skimmer is not placed under the same pressure.
Fill the form below and our team will be in touch with you shortly.
Heavy rain can saturate the ground, expose poor drainage and increase movement around the pool edge.
Water beneath the paving may make an existing skimmer crack or failed joint more noticeable. Wet ground can also make it difficult to distinguish pool leakage from rainwater.
The pool water level and area should be observed again after the surrounding ground has begun drying.
A leak may become more noticeable during summer because evaporation and pool use already lower the water level.
Dry soil can also contract and expose movement around older pool structures. Windblown leaves may block the skimmer basket and place additional strain on weak suction connections.
A simple evaporation comparison can help establish whether the loss is greater than normal weather-related water loss.
Resurfacing, tiling, coping and paving work can disturb the skimmer joint or nearby plumbing.
The skimmer may have been moved, exposed or placed under pressure while surrounding materials were removed. A new tile finish can also hide a poorly repaired joint.
Leaks that begin shortly after renovations should be investigated before the surrounding finishes are patched again.
Fill the form below and our team will be in touch with you shortly.
Excavation and compaction near the skimmer can disturb its pipe connections.
New paving may also be installed too tightly against the skimmer lid or upper pool structure, creating pressure as the paving moves.
The skimmer and pipework should be tested where water loss begins after poolside paving work.
Leaving the pool empty can expose the skimmer joint and surrounding finishes to drying and temperature changes.
Existing cracks may widen, and plastic components can move differently from the concrete shell.
The skimmer should be inspected before the pool is refilled following long-term drainage or renovation work.
Recurring leakage can indicate that the earlier repair treated only the visible surface.
The crack may extend deeper into the body, joint or suction connection. Movement and water pressure can then reopen the patched area.
The old material should be removed so the complete defect can be exposed and repaired properly.
Fill the form below and our team will be in touch with you shortly.
Some skimmer leaks can be sealed when the defect is limited to a stable joint or small accessible crack.
The damaged area must be cleaned and prepared back to secure material. A repair system suitable for permanent water exposure is then applied.
Surface sealing is less reliable when the skimmer body is brittle, the pipe connection is damaged or structural movement remains active.
Repair may be suitable when:
The repaired area should be tested before tiles, coping and paving are reinstated.
Fill the form below and our team will be in touch with you shortly.
Replacement may be more practical when the skimmer body is badly cracked, brittle, distorted or damaged in several places.
A replacement can also be recommended when the original skimmer is poorly supported, the pipe connection has failed extensively or repeated repairs have not stopped the leak.
Replacement generally requires access through the surrounding paving and pool edge. Waterline tiles, coping and marbelite may need to be reinstated afterwards.
Some skimmer-throat and upper-joint repairs can be completed after lowering the water below the affected area.
A complete drain may not be necessary when the defect sits near the normal waterline. Deeper structural work, fibreglass repairs or wider resurfacing may require additional access.
The pool should not remain empty longer than necessary, particularly where groundwater or structural movement may be a concern.
Using the pool may worsen water loss and place strain on the circulation system.
Swimming should be avoided when the paving, coping or tiles around the skimmer are loose or sharp. The pump should not operate when the water is too low for the skimmer to supply it properly.
The pool can often remain filled to a safe level while inspection and repairs are arranged, depending on the severity and location of the leak.
Fill the form below and our team will be in touch with you shortly.
Yes. A leak on the suction side can allow air into the system.
The pump may lose prime, cavitate, overheat or run partly dry. Continued operation can damage the mechanical seal, impeller and pump housing.
Air bubbles, surging water and a half-empty pump basket should be addressed promptly.
Yes. Escaping water can wash away bedding sand and supporting soil beneath paving and coping.
The resulting voids can cause paving to sink, coping to loosen and waterline tiles to crack. Moisture may also affect nearby walls, garden beds and equipment bases.
Locating the leak early can reduce the amount of surrounding repair work required.
A basic comparison can help establish whether the water loss is likely to exceed normal evaporation.
A container filled with pool water can be placed securely where it experiences similar weather conditions. The pool and container levels are marked and compared after a suitable period.
A larger drop in the pool suggests active water loss, but this does not identify the source. Splashing, rainfall and automatic fillers can affect the result.
Professional testing is still needed to confirm whether the skimmer, pool structure or underground plumbing is responsible.
Fill the form below and our team will be in touch with you shortly.
Absolute Pools checks the visible skimmer body, throat, surrounding tiles, coping and paving for cracks and movement.
The water-loss pattern and level at which the pool stabilises provide useful clues. The pump basket, suction strength and return bubbles are considered where air may be entering the system.
The skimmer joint, body and accessible pipe connections can be tested more closely. Underground suction lines may require pressure or vacuum testing where a pipe leak is suspected.
The aim is to distinguish between a failed skimmer joint, cracked body, damaged pipe and unrelated pool leak before finishes are removed unnecessarily.
Skimmer leak detection may include:
A pool may have both a skimmer leak and another plumbing fault. Each suspected source should be confirmed before repairs are completed.
The damaged finish around the skimmer is removed until secure material is reached.
Loose grout, tiles, marbelite and previous sealant are taken away. The joint is then cleaned, prepared and rebuilt using materials suited to constant water exposure.
The surrounding pool finish is reinstated after the repair has cured and been tested.
Fill the form below and our team will be in touch with you shortly.
A local repair may be possible when the crack is accessible and the surrounding body remains strong.
The damaged area is prepared beyond the visible crack so the repair bonds with secure material. The skimmer is then tested before the surrounding paving or tiles are restored.
Replacement may be safer when the plastic has become brittle or several cracks are present.
Targeted access is created through the surrounding paving or soil to reach the damaged pipe or connection.
The faulty section is repaired or replaced and tested before the excavation is closed. The area is then refilled and compacted properly to reduce future settlement.
The paving and coping are reinstated after the plumbing repair has been confirmed.
Skimmer replacement involves removing enough of the surrounding pool edge to access the existing body and pipe connections.
The old skimmer is removed, and the replacement is aligned and supported securely. The pipework is connected and tested before the pool wall, tiles, coping and paving are rebuilt.
The new joint between the skimmer and pool structure must be sealed carefully because this transition is a common source of future leaks.
Fill the form below and our team will be in touch with you shortly.
A long-term skimmer leak may leave voids beneath the pool surround.
Loose paving and coping are removed so washed-out material can be replaced. The base is rebuilt and compacted before the surfaces are reinstated.
Waterline tiles, grout and marbelite may also need repair where movement has spread into the pool edge.
The paving should drain water away from the repaired skimmer area.
Maintain the correct pool water level so the skimmer does not repeatedly draw air.
Clean the skimmer basket before debris restricts flow and places strain on the suction system. Avoid forcing oversized baskets, plates or cleaner fittings into the opening.
Repair cracked grout, loose tiles and moving coping before water enters behind the skimmer joint.
Address wet paving, sinking areas and unexplained water loss early. Drainage and irrigation should not keep the ground around the skimmer continually saturated.
Absolute Pools diagnoses and repairs leaking pool skimmers across Cape Town and surrounding areas, including the Northern Suburbs, Southern Suburbs, Atlantic Seaboard, Cape Town City Bowl, West Coast suburbs and Helderberg.
Service areas include Durbanville, Bellville, Brackenfell, Kraaifontein, Parow, Goodwood, Milnerton, Table View, Parklands, Blouberg, Century City, Pinelands, Rondebosch, Claremont, Newlands, Constantia, Tokai, Wynberg, Plumstead, Hout Bay, Sea Point, Green Point, Camps Bay, Somerset West, Strand, Gordon’s Bay, Stellenbosch, Paarl and surrounding areas.
Fill the form below and our team will be in touch with you shortly.
Absolute Pools checks the skimmer body, pool-wall joint, suction pipe, coping, tiles and surrounding paving before recommending repairs.
We assist with pool leak detection, skimmer sealing, cracked skimmer repairs, suction-pipe repairs, skimmer replacement and reinstatement of damaged pool surrounds.
Our focus is on identifying the actual source of the water loss and repairing the complete damaged area rather than repeatedly applying sealant over an unresolved crack or pipe fault.
A leaking skimmer can waste water, draw air into the pump and wash away support beneath paving and coping.
Contact Absolute Pools for pool skimmer leak detection and repairs across Cape Town and surrounding areas.
Fill the form below and our team will be in touch with you shortly.
WhatsApp us